Scratch and Dent Discount! Minor cosmetic flaws do not affect performance.
Farpoint Bahtinov Mask - Celestron 8 Classic is an ingenious new way to easily focus a telescope. Pavel Bahtinov, a Russian amateur telescope maker and astronomer, created this simple, very intuitive method and the device has universally been named after him: The Bahtinov Mask.
Farpoint Bahtinov Mask - Celestron 8 Classic (For Pre-2008 C8 Telescopes)
Farpoint Bahtinov Mask - Celestron 8 Classic is an ingenious new way to easily focus a telescope. Pavel Bahtinov, a Russian amateur telescope maker and astronomer, created this simple, very intuitive method and the device has universally been named after him: The Bahtinov Mask.
Adjustable Bahtinov Focus Mask for older “classic” Celestron 8″ SCT without Fastar or Hyperstar. Most if not all newer C8’s have Fastar or they are “Fastar Ready”. Select model FP410H for all new Celestron scopes (post 2008).
Attach a camera to the telescope, center a fairly bright star and achieve rough focus. Then place the mask over the front aperture of your telescope by “hanging” it on the plastic screws from the front dew shield. Take a short exposure. The image of the star will show diffraction spikes. The “center” set will most likely be shifted to one side or the other. This is showing the defocus.
Adjust the focus of the telescope and re-expose the star, once again showing the diffraction spike pattern. Iterate the process until the central diffraction spike is centered against the star and the other spikes. When a symmetrical pattern is achieved, the best possible focus is then reached. Simply remove the mask, center the target object and take amazing, sharp images!
Farpoint manufactures this "lifesaving" astrophotography tool out of virtually indestructible ABS plastic, which comes in two major types and in a range of sizes. In addition to Bahtinov masks for telescopes, Farpoint also makes Bahtinov masks for DSLR camera lenses.
Bahtinov Masks Are one of the best tools for manually focusing your telescope available to astrophotographers. In 2005, Pavel Bahtinov, a Russian amateur telescope maker and astronomer detailed a new way to easily focus your DSLR, CMOS or CCD camera for astrophotography by adding a mask that matches the diameter of your telescope.
Bahtinov mask are a less expensive method of getting focus on objects in the night sky compared to a standard motor focuser.
With the right mask and setup it’s easy to get crystal clear focus on a star in less than 90 seconds.
Here is a youtube Demonstration

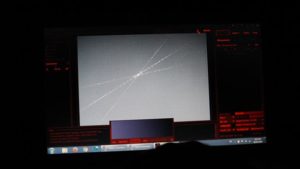
Star in focus via a Bahtinov mask
How it Works
The slits in the mask are the focus assist, when the star is in focus it will appear on your screen display as an “X” with a line through the center (see above).
These mask will work equally as well on the end of a scope or on the end of a dew shield on top of that the mask itself does not need to be perfected centered on the scope this is due to the angle of the slits themselves.
Select a bright star, this will be your guiding object. Place the Bahtinov focusing mask on your telescope’s lens and secure it into place using the provided rubber tabs.
The slits in the mask design create a set of diffraction spikes on the star that will assist in the accuracy of our focus. It will appear on your DSLR display screen or computer as an “X” with a line through the center (when in focus).

The diffraction spike pattern from a bright star using a Bahtinov mask
As you adjust the focuser of your telescope, the central spike will move in and out of the X-pattern. If you are using capture software be sure to compensate for the lag time between exposures on the screen, typically 4-5 seconds.
The same process applies using Live view display on your DSLR camera. The difference is, the image will be much dimmer, as you are essentially looking at a live video feed rather than a short image exposure.
You may also like
Recently viewed


